Monday, February 20, 2023
Sunday, February 19, 2023
How to return a 2-Dimensional array in C using a pointer
#include#include // Function to perform matrix multiplication double* matrix_multiply(double* matrix1, double* matrix2, int rows1, int cols1, int cols2) { double* result = (double*)malloc(rows1 * cols2 * sizeof(double)); // Allocate memory for the result matrix int i, j, k; for (i = 0; i < rows1; i++) { for (j = 0; j < cols2; j++) { result[i*cols2+j] = 0; // Initialize the result element to 0 for (k = 0; k < cols1; k++) { result[i*cols2+j] += matrix1[i*cols1+k] * matrix2[k*cols2+j]; // Perform matrix multiplication } } } return result; // Return the pointer to the result matrix } int main() { double matrix1[2][3] = {{1, 2, 3}, {4, 5, 6}}; // Define the first matrix double matrix2[3][2] = {{1, 2}, {3, 4}, {5, 6}}; // Define the second matrix int rows1 = 2, cols1 = 3, cols2 = 2; // Define the dimensions of the matrices // Call the matrix_multiply function and store the result in a pointer double* result = matrix_multiply(&matrix1[0][0], &matrix2[0][0], rows1, cols1, cols2); // Print the result matrix int i, j; for (i = 0; i < rows1; i++) { for (j = 0; j < cols2; j++) { printf("%.2f ", result[i*cols2+j]); } printf("\n"); } free(result); // Free the memory allocated for the result matrix return 0; }
How to call a C function in Structure Text (Twincat ) ?
PROGRAM MAIN
VAR
    a : ARRAY[1..3, 1..3] OF INT := [ [1, 2, 3], [4, 5, 6], [7, 8, 9] ];
    b : ARRAY[1..3, 1..3] OF INT := [ [9, 8, 7], [6, 5, 4], [3, 2, 1] ];
    c : ARRAY[1..3, 1..3] OF INT;
    a2d : STRUCT
        array : ARRAY[1..3, 1..3] OF INT;
    END_STRUCT;
    b2d : STRUCT
        array : ARRAY[1..3, 1..3] OF INT;
    END_STRUCT;
    c2d : STRUCT
        array : ARRAY[1..3, 1..3] OF INT;
    END_STRUCT;
    hLib : UINT := 0;
    pFunc : UINT := 0;
    result : INT := 0;
END_VAR

// Load the C library containing the matrixMultiplication function
hLib := SysLibLoad('MyLibrary.dll');

// Get the address of the matrixMultiplication function
pFunc := SysLibGetProcAddress(hLib, 'matrixMultiplication');

// Convert the input matrices to C-compatible data types
a2d.array := a;
b2d.array := b;

// Call the matrixMultiplication function using a CCFB
result := CCFBInvoke(pFunc, ADR(a2d), ADR(b2d), ADR(c2d));

// Check the result of the function call
IF result = 0 THEN
    // Convert the output matrix to ST-compatible data type
    c := c2d.array;
ELSE
    // Handle the error
END_IF

// Unload the C library
SysLibFree(hLib);
We also define three STRUCT types a2d, b2d, and c2d, which have the same layout as the struct Array2D type used in the matrixMultiplication function.
How to return a 2-Dimensional array in C using a Structure
#includestruct Array2D { int array[3][3]; }; struct Array2D matrixMultiplication(struct Array2D a, struct Array2D b) { struct Array2D result {0}; int i, j, k; for (i = 0; i < 3; i++) { for (j = 0; j < 3; j++) { result.array[i][j] = 0; for (k = 0; k < 3; k++) { result.array[i][j] += a.array[i][k] * b.array[k][j]; } } } return result; } int main() { struct Array2D a = { {{1, 2, 3}, {4, 5, 6}, {7, 8, 9}} }; struct Array2D b = { {{9, 8, 7}, {6, 5, 4}, {3, 2, 1}} }; struct Array2D c = matrixMultiplication(a, b); // Print the result printf("Result of matrix multiplication:\n"); for (int i = 0; i < 3; i++) { for (int j = 0; j < 3; j++) { printf("%d ", c.array[i][j]); } printf("\n"); } return 0; }
Friday, February 17, 2023
What is React Child to Parent communicaiton ?
In React with TypeScript, child-to-parent communication is typically achieved by passing callbacks from the parent component to its child components as props. The child component can then call the callback to send data or events back to the parent component.
Here's an example of how this might look in code:
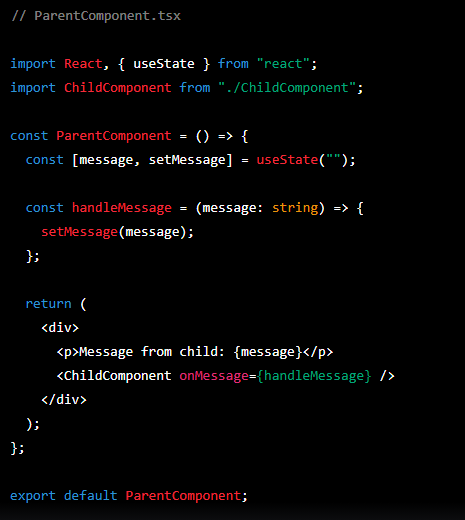

In this example, the ChildComponent receives a onMessage callback function as a prop from its parent ParentComponent. When the user submits the form in the ChildComponent, the handleSubmit function is called and it calls the onMessage callback with the current value of the input field.
The ParentComponent handles the onMessage callback by setting the message state to the value passed by the child component. This causes the ParentComponent to re-render with the updated message value, which is then displayed on the screen.
This is a simple example, but it demonstrates the basic concept of passing callbacks from a parent component to its child components in React with TypeScript, and using those callbacks to send data or events back to the parent component.
What is React Parent to child communicaiton ?
In React with TypeScript, parent-to-child communication is typically achieved by passing props from the parent component to its child components.
When a parent component renders a child component, it can pass data or functions to the child component using props. The child component can then access this data or functions through its props and use them as needed.
Here's an example of how this might look in code:


In this example, the ParentComponent passes two props to the ChildComponent: the count variable and the handleIncrement function. The ChildComponent then renders a button that calls the onIncrement function when clicked, and also displays the count prop.
This is a simple example, but it demonstrates the basic concept of passing data and functions from a parent component to its child components in React with TypeScript.
what is side effects and lifecycle in React ?
In React with TypeScript, a "side effect" refers to any behavior that occurs outside the component's render cycle, such as modifying the DOM, making an API request, or updating a global state.
In functional components, side effects are managed using the useEffect hook. This hook allows you to perform an action when the component mounts, updates, or unmounts. Here's an example of using useEffect to fetch data from an API:

In this example, the useEffect hook is used to make an API request when the component mounts, and updates the data state with the response. The second argument to useEffect is an array of dependencies, which determines when the effect should run. An empty array means it only runs once, when the component mounts.
The "lifecycle" of a component refers to the different stages it goes through from creation to removal. In class components, these stages are defined by a set of lifecycle methods, such as componentDidMount, componentDidUpdate, and componentWillUnmount. In functional components, the useEffect hook is used to manage these stages.
The React component lifecycle can be represented by the following methods:
- componentDidMount: called once when the component is first mounted
- componentDidUpdate: called after the component updates (i.e. state or props change)
- componentWillUnmount: called when the component is about to be removed from the DOM
In functional components, you can use useEffect to perform similar tasks. The useEffect hook can be used to mimic the behavior of all three of the above methods:
- useEffect(() => { ... }, []) - mimics componentDidMount
- useEffect(() => { ... }) - mimics componentDidUpdate
- useEffect(() => { return () => { ... } }) - mimics componentWillUnmount
Thursday, February 16, 2023
what is a Hook in React ?
- useState: allows you to add state to functional components
- useEffect: allows you to add side effects (e.g., data fetching, event listeners) to your components
- useContext: allows you to access a context object created by a ContextProvider component
- useRef: allows you to create a mutable reference that persists across renders
- useReducer: an alternative to useState that allows you to manage more complex state in a functional way .

What is FC or function component in React ?

What is the use of CONST in React ?
const myNumber: number = 42;

What is Proptypes in React ?
import React from 'react';
import PropTypes from 'prop-types';
function Greeting(props) {
return Hello, {props.name}!
;
}
Greeting.propTypes = {
name: PropTypes.string.isRequired,
};
export default Greeting;
The spread syntax or the rest syntax in Javascript or Typescript
const arr1 = [1, 2, 3];
const arr2 = [...arr1, 4, 5, 6];

console.log(arr2); // [1, 2, 3, 4, 5, 6]
const obj1 = { a: 1, b: 2 };
const obj2 = { ...obj1, b: 3, c: 4 };

console.log(obj2); // { a: 1, b: 3, c: 4 }
const myFunc = (a: number, b: number, c: number) => {
  console.log(a + b + c);
};

const arr = [1, 2, 3];
myFunc(...arr); // 6

const obj = { a: 1, b: 2, c: 3 };
myFunc(...Object.values(obj)); // 6
Wednesday, February 1, 2023
how to create a solr document with autogenerated unique id ?
import org.apache.solr.client.solrj.SolrClient;
import org.apache.solr.client.solrj.SolrServerException;
import org.apache.solr.client.solrj.impl.HttpSolrClient;
import org.apache.solr.common.SolrInputDocument;

import java.io.IOException;

public class SolrJExample {
    public static void main(String[] args) throws SolrServerException, IOException {
        String solrUrl = "http://localhost:8983/solr/your_core_name";
        SolrClient solrClient = new HttpSolrClient.Builder(solrUrl).build();

        SolrInputDocument document = new SolrInputDocument();
        document.addField("field1", "value1");
        document.addField("field2", "value2");

        solrClient.add(document);
        solrClient.commit();
    }
}